The Real Process to Develop an App from Start to Finish
Discover the real process to develop an app with our guide. We cover actionable strategies for research, design, coding, testing, and launch.The app development process isn't just a single event; it's a lifecycle. It starts with vetting a strategic idea, flows through design and development, and continues with rigorous testing, deployment, and ongoing support. This roadmap is what turns a raw concept into a functional, market-ready product.
Your App Development Roadmap From Idea to Launch
Before a single line of code gets written, you absolutely need a clear roadmap. The journey from a great idea to a successful app is a structured process, not just a frantic sprint of creativity. And make no mistake, it's a competitive world out there. By 2025, global mobile app downloads are projected to hit a staggering 299 billion—that’s an 8% jump from 2023. Knowing this makes having a solid plan more critical than ever.
To set some realistic expectations, let's pull back the curtain on the app development lifecycle and break it down into distinct, manageable stages. We’ll even follow the journey of a hypothetical fitness tracking app to show you how a simple concept grows into a polished product. This groundwork helps you sidestep the common pitfalls that sink so many app ideas before they even get off the ground.
From Lightbulb Moment to Concrete Plan
Every successful app begins not just with an idea, but with a validated one. I’ve seen countless projects fail because they skipped this step. Rushing into development without proper validation is like trying to build a house without a blueprint—it’s a recipe for disaster. This initial phase is all about refining your concept and making sure there’s a real, tangible need for it in the market.
This graphic breaks down the first three crucial steps for refining your app idea before any technical work begins.
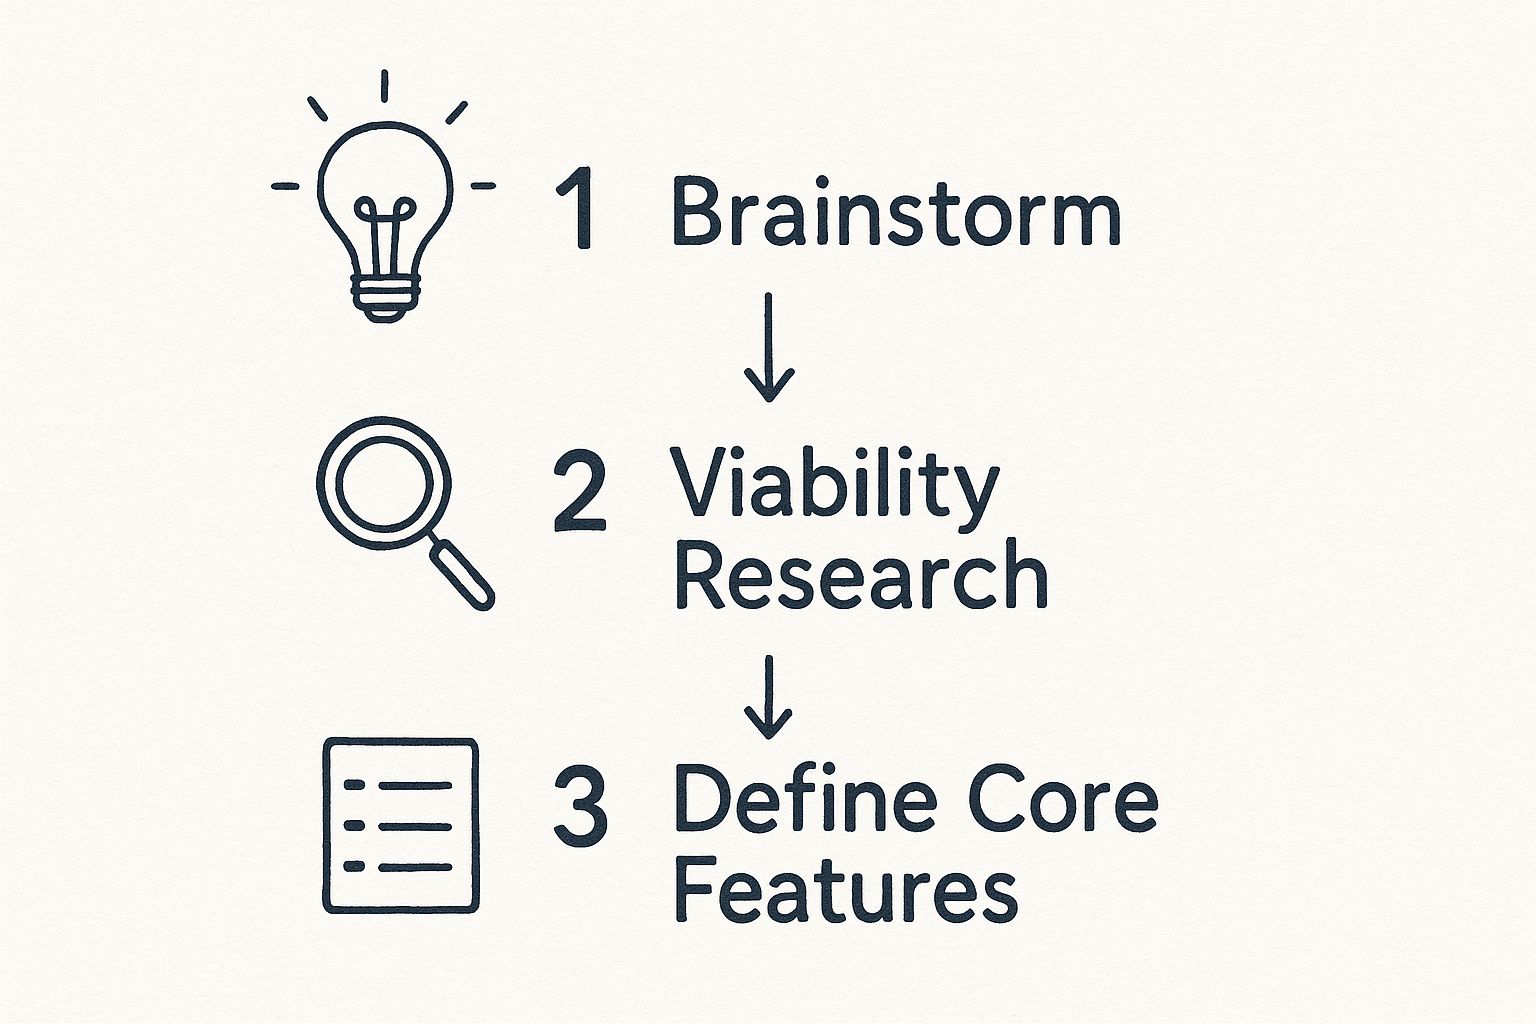
As you can see, the flow from brainstorming to defining features isn't random; it highlights the need for a structured, strategic approach right from the start.
This early work ensures you’re building something people will actually use. For our fitness app example, that means going from a vague "let's build a workout tracker" to something much more specific, like "a workout tracker for busy parents with 30-minute home routines." See the difference?
A well-defined strategy is the single most important factor that separates successful apps from the ones that never gain traction. It forces you to answer the hard questions upfront: Who is this for? What problem does it solve? Why would someone choose it over alternatives?
By focusing on these strategic elements first, you create a solid foundation for the entire project. This methodical approach is a core part of effective digital product development services that are built for long-term success.
To give you a bird's-eye view, here's a quick breakdown of the entire process.
Key Stages of the App Development Process
This table summarizes the essential phases you'll go through, highlighting the main goal and what you should have in hand at the end of each one.
| Phase | Primary Goal | Key Deliverable |
|---|---|---|
| Strategy & Planning | Validate the app idea and define project scope. | A detailed project brief, market research report, and feature list (MVP). |
| UI/UX Design | Create an intuitive and visually appealing user experience. | Wireframes, mockups, and an interactive prototype. |
| Development | Build the functional app based on the design specifications. | A working alpha/beta version of the app. |
| Testing & QA | Identify and fix bugs to ensure a stable, high-quality product. | A thoroughly tested and stable app ready for deployment. |
| Deployment | Launch the app on the relevant app stores (e.g., Apple, Google). | The live app available for public download. |
| Maintenance & Support | Provide ongoing updates, bug fixes, and feature enhancements. | Regular app updates and performance monitoring reports. |
Think of this table as your high-level map. The rest of this guide will zoom in on each of these stages, giving you the detailed, practical advice you need to navigate the complete app development process.
Validating Your Idea with Market Research
Every great app starts with a spark of an idea. But an idea, no matter how brilliant, is just a starting point. To build something people will actually download and use, you have to move from what you think they want to what you know they need. This is where you roll up your sleeves and pressure-test your concept against the real world.
Think of it this way: you wouldn't build a house without checking the foundation first. Skipping this validation step is the digital equivalent of building on sand, and it often leads to costly rework down the line. It's all about ensuring you're solving a real problem for a specific group of people.

This phase is where you dig deep into market research, size up the competition, and figure out what makes your app different. It isn't just about avoiding failure—it's about strategically setting yourself up for a successful launch.
Identifying and Analyzing Your Competition
Before you can carve out your own space, you need a clear picture of the neighborhood. Competitor analysis isn't just about making a list of other apps; it's about a deep dive into what they do well, where they fall short, and what opportunities they’ve missed.
Here’s an actionable way to start: create a spreadsheet. List 3-5 top competitors. For each, analyze their app store ratings, read the 1-star and 5-star reviews, and note their key features and pricing. This simple exercise will quickly reveal market gaps.
I always recommend looking for two kinds of competitors:
- Direct Competitors: These are the apps doing almost exactly what you plan to do, for the same audience. For our fitness app, this would be MyFitnessPal or Strava.
- Indirect Competitors: These apps solve the same core problem but take a different route. For the fitness app, an indirect competitor could be Peloton (hardware-focused) or even a mindfulness app like Calm that competes for "self-improvement" time.
Once you have your list, head straight to the App Store and Google Play reviews. What are people raving about? What bugs or missing features are they complaining about? This is pure, unfiltered feedback from your target audience, and it's a goldmine for finding ways to create a better experience.
The goal isn't to copy what's already out there. It's to learn from their wins and their mistakes. A solid competitor analysis will clearly illuminate the gaps in the market—and that’s exactly where your app’s unique value will shine.
Creating Detailed User Personas
Here’s a hard truth: you can't build an app for "everyone." The most successful products are built with a laser focus on a specific type of user. That’s where user personas come in. A persona is a detailed, semi-fictional profile of your ideal customer, built from real-world research. It’s way more than just demographics.
A truly useful persona captures:
- Motivations: What’s the real reason they need a solution like yours?
- Goals: What are they ultimately trying to accomplish?
- Pain Points: What specific frustrations do they have with the current way of doing things?
For example, a persona for our fitness app might be "Busy Mom Maria." Her motivation is to regain pre-pregnancy fitness. Her goal is to squeeze in effective workouts during her baby's nap time. Her pain point is that most fitness apps require long sessions or gym equipment she doesn't have. This detailed profile becomes your north star, guiding every feature and design decision you make.
Defining Your Minimum Viable Product
Armed with insights about your users and the competitive landscape, you’re ready to define your Minimum Viable Product (MVP). The MVP isn’t a half-baked app; it’s the simplest, most streamlined version of your product that effectively solves the core problem for your target user.
For "Busy Mom Maria," the MVP wouldn't include calorie tracking, social sharing, or live classes. The core problem is finding quick, equipment-free workouts. So, the MVP would be a simple library of 20-minute bodyweight video workouts and a basic calendar to track consistency. That’s it. This lets you learn and iterate without sinking years of development into features nobody wants. You can learn more about how an MVP development company can help accelerate this critical phase.
The app world has changed dramatically over the years. Early on, development was all about building platform-specific native apps. Now, with a staggering 2.87 million apps on the Google Play Store alone, a focused MVP is more critical than ever to cut through the noise. These mobile app development statistics paint a clear picture of just how competitive the field has become.
Designing an Intuitive User Experience
Alright, you’ve validated your idea and you know exactly who you’re building this app for. Now comes the fun part: moving from abstract ideas to a visual blueprint. This is the design phase, and it’s where your app starts to take on a life of its own.
But let’s be clear—this isn’t just about making things look pretty. This is about building a seamless, intuitive journey for your user. It’s a craft that hinges on two distinct but deeply connected disciplines: User Experience (UX) and User Interface (UI).
Think of it like this: UX is the solid foundation and structural engineering of a house—how you move from room to room, the logic of the layout. UI is the interior design—the paint colors, furniture, and fixtures that make it a beautiful and functional space. Your app needs both to be a winner.
From Simple Sketches to Interactive Prototypes
One of the most common—and costly—mistakes I see teams make is jumping straight into pixel-perfect, polished designs. The smart move is to work your way up, moving from low-fidelity concepts to high-fidelity ones. This approach lets you spot and fix usability problems early, when changes are quick and cheap.
This design journey really breaks down into three key stages:
- Wireframes: These are the bare-bones sketches of your app's screens. We’re talking basic black-and-white layouts, almost like an architectural blueprint. The whole point is to focus purely on structure, content placement, and user flow, without getting distracted by colors or fonts.
- Mockups: Once everyone agrees on the wireframes, the UI designers step in to create high-fidelity mockups. These are static, full-color designs that show exactly how the app will look. They incorporate your brand's color palette, typography, icons, and spacing.
- Prototypes: This is where the magic happens. We turn those static mockups into interactive, clickable prototypes using tools like Figma or Adobe XD. It's not a working app yet, but it feels like one. Users can tap through screens, test the navigation, and give you real-world feedback on the flow before a single line of code is written.
Let’s go back to our fitness app example. The "Workout Logging" screen wireframe would just be boxes and lines showing where the exercise list, timer, and "Save" button should go. The mockup would add the brand's vibrant colors and specific fonts. The prototype would let you actually tap "Add Exercise," scroll through a list, and see a confirmation screen pop up.
Mapping the User Flow
Before you even think about sketching a screen, you need to map out the user flow. This is essentially a diagram that charts every single step a person takes to get something done in your app. A practical action step is to use a free tool like Miro or even just a whiteboard to physically draw this out.
For a new user in our fitness app, the flow might look something like this:
- Open App -> Sign Up Screen -> Enter Personal Details -> Set Fitness Goals -> See Welcome Screen -> Land on Main Dashboard
A well-defined user flow is your best defense against confusing navigation or dead ends. The goal is to make using the app feel so natural that people don't even have to think about what to do next.
A seamless user experience is invisible. When design is done right, the user doesn't notice the design; they only notice that they accomplished their task effortlessly. This is the benchmark for any successful app.
Building a Cohesive Design System
To keep your app looking and feeling consistent from screen to screen, you need a design system. This is your single source of truth—a collection of reusable components, styles, and rules that govern your app's visual language.
A solid design system typically defines:
- Color Palette: Your primary, secondary, and accent colors. For example: Primary Blue: #007AFF, Destructive Red: #FF3B30.
- Typography: The specific fonts, sizes, and weights for all text. For example: H1: SF Pro Bold, 34pt; Body: SF Pro Regular, 17pt.
- Iconography: A unified set of icons for every action and feature.
- Components: Standardized elements like buttons, input fields, and navigation bars.
Putting in the work to create a design system upfront saves a tremendous amount of time down the road. It ensures a polished, professional product and makes development much more efficient. Getting UI and UX right is a specialized skill, which is why many companies find success working with the best UX design agencies to nail this foundational part of the app development process.
Turning Your Vision into a Working App
This is where the rubber meets the road. All the planning, sketches, and strategies finally start taking shape as actual, usable code. We’re moving from the blueprint to the build, and it all starts with one of the most critical decisions in the entire process: the technology stack.

The tech you choose will define your app's performance, how easily it can grow, and how much it'll cost to build and maintain. It's a choice that ripples through the entire project. The big question here is whether to build two separate, dedicated apps for iOS and Android (native) or use a single codebase for both (cross-platform). Each approach has its own set of pros and cons you'll need to weigh carefully.
The Big Debate: Native vs. Cross-Platform
Deciding between native and cross-platform isn't just a technical detail; it’s a core business strategy.
Native apps are built specifically for one operating system. That means using Apple's preferred languages (Swift or Objective-C) for iOS and Google's (Kotlin or Java) for Android. The payoff? You get the absolute best performance, the smoothest animations, and instant access to the latest device features. Practical example: a photo editing app that needs deep access to the phone's camera and GPU would benefit greatly from being native.
Cross-platform frameworks, on the other hand, like React Native or Flutter, let you write the code once and run it on both platforms. This can seriously speed up development and cut down on costs, which is a huge win for getting an MVP out the door. Practical example: a simple content-based app, like a news reader or a basic e-commerce store, is a perfect candidate for cross-platform development.
Here's a quick breakdown to help you see the difference:
| Factor | Native Development | Cross-Platform Development |
|---|---|---|
| Performance | Top-of-the-line speed and responsiveness. | Very good, but can feel a step behind a true native app. |
| User Experience | Looks and feels exactly like the OS it was built for. | A unified look on both platforms, which can feel less integrated. |
| Cost & Speed | More expensive and takes longer to build two separate apps. | Cheaper and faster to get to market with a single codebase. |
| Feature Access | Day-one access to new OS features and hardware APIs. | Can lag a bit in supporting the latest device functionalities. |
So, for our meal delivery app, if a buttery-smooth user experience and lightning-fast performance are your top priorities, you'd go native. But if you need to validate your idea with real users as quickly as possible, a cross-platform framework like Flutter is probably the smarter, more efficient move.
Front-End and Back-End: The Two Sides of the Coin
Every app has two distinct parts that work in tandem: the front-end and the back-end. Think of it as the stage and the backstage crew of a theater production.
Front-End Development: This is the "stage"—everything the user actually sees and interacts with. It’s the visual interface: the buttons they tap, the menus they scroll through, and the forms they fill out. For our fitness app, this is the code that displays the workout videos and animates the progress circle when a workout is completed.
Back-End Development: This is the "backstage"—the powerful engine running everything behind the scenes. It's the server, the database, and the core logic. When a user in our fitness app completes a workout, the back-end saves that data to their profile, updates their streak, and stores it in the database for future reference.
Connecting these two worlds is the Application Programming Interface (API). The API is like a waiter, taking requests from the front-end (the customer) and delivering them to the back-end (the kitchen), then returning the results.
Many teams also rely on custom web application development to create powerful admin panels. This gives the business team a way to manage the back-end—like adding new workouts to the fitness app or viewing user engagement statistics—without needing to write any code.
Working Smart: Agile Methods and Version Control
Long gone are the days of building an entire app in one go and hoping for the best. Today, the smartest teams use agile methodologies like Scrum. Instead of one massive project, you break the work down into small, bite-sized chunks called "sprints," which usually last 1 to 4 weeks.
At the end of each sprint, you have a small, working piece of the app to show for it. For our fitness app, Sprint 1 might deliver just the user signup and login flow. Sprint 2 adds the ability to browse workout categories. This iterative cycle lets you get constant feedback, adapt to changes, and avoid any major surprises down the line.
Agile isn't just a project management system; it's a philosophy. It’s all about collaboration, responding to feedback, and being flexible enough to pivot when needed—which is crucial in the tech world.
To keep all this evolving code from turning into chaos, developers use version control systems. The undisputed king here is Git. Think of Git as a detailed history book for your code. It tracks every single change, allows multiple developers to work on the same project without stepping on each other's toes, and makes it easy to roll back to an earlier version if something breaks. It’s the safety net that keeps development organized, efficient, and sane.
Polishing Your App with Rigorous Testing
You’ve survived the design mockups and powered through the development sprints. It feels like you’re at the finish line, right? Not so fast. This next phase is where the real magic happens, turning a functional app into a fantastic one.
Releasing a buggy, slow, or confusing application isn't just a minor hiccup; it's a surefire way to get lost in a sea of competitors. Rigorous quality assurance (QA) isn't optional—it's the critical step that separates professional-grade products from half-baked attempts.
This isn't just about squashing bugs, either. It’s a deep-dive into polishing the user experience until your app is stable, intuitive, and truly ready for its debut. Skipping or rushing this part is a classic mistake, and it's why so many new apps fail to get any traction. A single crash or one broken feature is often all it takes for a user to hit "uninstall" and never look back.
Different Angles of Attack for Testing
Great QA means looking at your app from every possible angle. It’s not enough to check if features "work." You need to know if they work well—under different conditions, on different devices, and for different people.
A solid testing strategy usually involves a few key approaches:
- Functional Testing: This is the nuts and bolts. Does each feature do exactly what it's supposed to? If you tap "Add to Cart," does the item actually land in the cart? We test every single button, link, and user journey to make sure it all functions as designed.
- Usability Testing: This goes a step beyond functionality. We start asking, "Is this app actually easy and enjoyable to use?" A feature can work perfectly from a technical standpoint but be so confusing that users just give up. This often means watching real people try to accomplish tasks and seeing where they get stuck.
- Performance Testing: How does your app hold up under pressure? This is where we check for speed, responsiveness, and stability. An actionable test is to see how the app performs when switching from Wi-Fi to a weak 3G cellular connection. Does it crash or handle the change gracefully?
- Compatibility Testing: Your app has to work flawlessly on a dizzying array of devices, screen sizes, and OS versions. Something that looks beautiful on the newest iPhone can be a complete mess on an older Android phone.
"Quality is not an act, it is a habit." – Aristotle. This couldn't be more true for app development. Building a reputation for reliability comes from a relentless commitment to testing, which is what ultimately earns long-term user trust.
Running a Beta Test That Actually Works
Automated tests are fantastic for catching code-level errors, but nothing—and I mean nothing—beats feedback from real, live humans. A beta test, where you give a pre-launch version to a select group of users, is an absolute goldmine of honest, unfiltered insight.
Let’s go back to our fitness app example. For a beta test, you’d want to find a diverse crew of testers: some who are tech-savvy, some who aren't; some who are marathon runners, and others who are just starting out. You'd ask them to use the app for a week and keep track of their experience.
Here’s how to make that beta test count:
- Set Clear Goals: Don't just turn them loose. Give them specific "missions." For the fitness app, you might say, "Please find and complete a 15-minute cardio workout and then try to schedule your next workout for tomorrow at 9 AM."
- Make Feedback Easy: If reporting a bug is a hassle, people won't do it. Use tools like Instabug or even a simple Google Form. The easier it is, the more feedback you'll get.
- Demand the Details: When a bug comes in, you need specifics. "The login is broken" is useless. A great bug report sounds more like this: "When I try to log in with my Google account on my Samsung Galaxy S21 (Android 12), the app hangs on a white screen and I have to force close it." That’s something your developers can actually fix.
Considering the average person spends around 3.5 hours a day on mobile apps, the expectations for a slick, seamless experience are incredibly high. The stats are tough—only about 25% of users come back to an app the day after they install it. A meticulous testing phase that perfects your onboarding and core features is your best shot at beating those odds. You can dig into more of these fascinating mobile app trends on adjust.com.
Getting on the App Stores and Staying There
After all the hard work of building and testing, it’s finally time to get your app into the hands of real users. This is the deployment stage, and it’s a lot more than just clicking a button. Launching successfully on the Apple App Store and Google Play Store is an art in itself, demanding a well-thought-out strategy.
Think of your app's store listing as its digital storefront. It’s your one shot to grab a potential user’s attention and convince them to hit "download." A great listing doesn't just describe your app; it sells it.
- Show, Don't Just Tell: High-quality screenshots and a quick video preview are absolutely essential. They need to instantly communicate your app's core purpose. For that fitness app we talked about, you’d want to show off the clean dashboard, the simple workout logger, and a motivating progress chart.
- Speak Your User's Language: Put yourself in their shoes. What words would they type into the search bar to find you? Instead of "Advanced Calisthenics Tracker," a better title might be "Home Workouts for Busy Moms." Sprinkle those keywords naturally throughout your app title and description to make sure you show up.
The Real Work Starts After You Launch
Getting your app live isn't crossing the finish line—it's just the start of the next race. From here on out, it’s all about growth, learning, and making your app better based on what people are actually doing with it. This is the part of the journey where a good app becomes a sustainable business.
You have to become obsessed with your analytics. Keep a close eye on metrics like daily active users, how long people stick around in each session, and your retention rates. An actionable insight: if you see a huge drop-off after the sign-up screen, that’s a massive red flag that your onboarding process is too long or confusing.
The most valuable insights you'll ever get won't come from your initial assumptions but from watching how thousands of real users interact with your product. This feedback loop is the engine of sustainable growth.
User reviews and feedback are pure gold. The good reviews build trust and social proof, but it's the negative ones that often give you a direct, unfiltered to-do list for your next update. Make it a habit to reply to reviews, both good and bad. It shows you're listening and actively improving the experience.
Listen to what your users are telling you, both directly and through their actions. Use that information to build a feature roadmap that delivers what they actually want, not just the cool ideas you came up with in a conference room. This user-centric approach is the cornerstone of great product development for startups, because it ensures your app evolves right alongside its audience.
Your Top App Development Questions, Answered
If you're thinking about building an app, you probably have a lot of questions. That’s a good thing. Getting these big questions answered upfront helps set a realistic roadmap and prevents costly surprises down the line.
Let's dive into the three questions I hear most often from founders and product managers.
How Much Does It Cost to Develop an App?
This is the big one, and the honest answer is: it depends. I’ve seen very simple MVPs come to life for under $10,000, while complex, enterprise-grade apps can easily soar past $250,000.
What drives that huge range? It really boils down to three things:
- Feature Complexity: A simple calculator app might cost $5,000. An app with user profiles, real-time chat, and payment processing is a different beast entirely, likely starting in the $50,000 - $100,000 range.
- Technology Choice: Building two separate, native apps for iOS and Android will always cost more than a single-codebase, cross-platform app.
- Team Location: An agency in San Francisco will have very different rates than a team in Eastern Europe or Southeast Asia.
The single best way to control costs is to ruthlessly prioritize your MVP. Get a clear, focused initial version defined, and you'll get a much more accurate quote.
A critical piece of advice: Don't forget about life after launch. Your budget needs to account for ongoing maintenance, server costs, bug fixes, and future feature updates. A good rule of thumb is to budget an additional 15-20% of the initial development cost per year for maintenance.
How Long Does the App Development Process Take?
Time is just as variable as cost. A focused, streamlined app could be in your hands in 3-4 months. A more ambitious project with intricate designs and backend systems? You’re likely looking at 9 months to a year, sometimes even longer.
The timeline is a direct result of the project's scope, the size and efficiency of your team, and how rigorous your testing process is. For a practical estimate, break your feature list into "must-haves," "should-haves," and "nice-to-haves." The "must-haves" will define the timeline for your first version.
Working with an agile methodology can make this feel much more manageable. Instead of waiting a year for the "perfect" app, you can launch a solid V1 sooner and then iterate based on what your actual users are telling you.
Should I Build a Native or Cross-Platform App?
This is a classic "it depends" scenario, and it’s all about trade-offs.
Native apps are built specifically for one operating system (iOS or Android). This gives you the absolute best performance, the slickest user experience, and direct access to all the device's hardware features. The downside? You're basically building and paying for two separate apps.
On the other hand, cross-platform frameworks like Flutter or React Native let you build from a single codebase that works on both platforms. This is a huge win for speed and budget. While there can be slight performance trade-offs for very demanding applications, it's often the perfect choice for startups that need to get to market quickly and efficiently.
Ready to turn your idea into a reality? The experts at Pixel One can guide you through every stage of the app development process. Get in touch with us today to start building your product.